本文为原创,如需转载,请注明作者和出处,谢谢!
Axis2可以通过模块(Module)进行扩展。Axis2模块至少需要有两个类,这两个类分别实现了Module和Handler接口。开发和使用一个Axis2模块的步骤如下:
1.编写实现Module接口的类。Axis2模块在进行初始化、销毁等动作时会调用该类中相应的方法)。
2.编写实现Handler接口的类。该类是Axis2模块的业务处理类。
3.编写module.xml文件。该文件放在META-INF目录中,用于配置Axis2模块。
4.在axis2.xml文件中配置Axis2模块。
5.在services.xml文件中配置Axis2模块。每一个Axis2模块都需要使用<module>元素引用才能使用。
6.发布Axis2模块。需要使用jar命令将Axis2模块压缩成.mar包(文件扩展名必须是.mar),然后将.mar文件放在
<Tomcat安装目录>/webapps/axis2/WEB-INF/modules目录中。
先来编写一个WebService类,代码如下:
<!--<br />
<br />
Code highlighting produced by Actipro CodeHighlighter (freeware)<br />
http://www.CodeHighlighter.com/<br />
<br />
-->packageservice;
publicclassMyService
{
publicStringgetGreeting(Stringname)
{
return"您好"+name;
}
}
下面我们来编写一个记录请求和响应SOAP消息的Axis2模块。当客户端调用WebService方法时,该Axis2模块会将请求和响应SOAP消息输出到Tomcat控制台上。
第1步:编写LoggingModule类
LoggingModule类实现了Module接口,代码如下:
<!--<br />
<br />
Code highlighting produced by Actipro CodeHighlighter (freeware)<br />
http://www.CodeHighlighter.com/<br />
<br />
-->packagemodule;
importorg.apache.axis2.AxisFault;
importorg.apache.axis2.context.ConfigurationContext;
importorg.apache.axis2.description.AxisDescription;
importorg.apache.axis2.description.AxisModule;
importorg.apache.axis2.modules.Module;
importorg.apache.neethi.Assertion;
importorg.apache.neethi.Policy;
publicclassLoggingModuleimplementsModule
{
//initializethemodule
publicvoidinit(ConfigurationContextconfigContext,AxisModulemodule)
throwsAxisFault
{
System.out.println("init");
}
publicvoidengageNotify(AxisDescriptionaxisDescription)throwsAxisFault
{
}
//shutdownthemodule
publicvoidshutdown(ConfigurationContextconfigurationContext)
throwsAxisFault
{
System.out.println("shutdown");
}
publicString[]getPolicyNamespaces()
{
returnnull;
}
publicvoidapplyPolicy(Policypolicy,AxisDescriptionaxisDescription)
throwsAxisFault
{
}
publicbooleancanSupportAssertion(Assertionassertion)
{
returntrue;
}
}
在本例中LoggingModule类并没实现实际的功能,但该类必须存在。当Tomcat启动时会装载该Axis2模块,同时会调用LoggingModule类的init方法,并在Tomcat控制台中输出“init”。
第2步:编写LogHandler类
LogHandler类实现了Handler接口,代码如下:
<!--<br />
<br />
Code highlighting produced by Actipro CodeHighlighter (freeware)<br />
http://www.CodeHighlighter.com/<br />
<br />
-->packagemodule;
importorg.apache.axis2.AxisFault;
importorg.apache.axis2.context.MessageContext;
importorg.apache.axis2.engine.Handler;
importorg.apache.axis2.handlers.AbstractHandler;
importorg.apache.commons.logging.Log;
importorg.apache.commons.logging.LogFactory;
publicclassLogHandlerextendsAbstractHandlerimplementsHandler
{
privatestaticfinalLoglog=LogFactory.getLog(LogHandler.class);
privateStringname;
publicStringgetName()
{
returnname;
}
publicInvocationResponseinvoke(MessageContextmsgContext)
throwsAxisFault
{
//向Tomcat控制台输出请求和响应SOAP消息
log.info(msgContext.getEnvelope().toString());
returnInvocationResponse.CONTINUE;
}
publicvoidrevoke(MessageContextmsgContext)
{
log.info(msgContext.getEnvelope().toString());
}
publicvoidsetName(Stringname)
{
this.name=name;
}
}
LogHandler类的核心方法是invoke,当使用该Axis2模块的WebService的方法被调用时,LogHandler类的invoke方法被调用。
第3步:编写module.xml文件
在META-INF目录中建立一个module.xml文件,内容如下:
<!--<br />
<br />
Code highlighting produced by Actipro CodeHighlighter (freeware)<br />
http://www.CodeHighlighter.com/<br />
<br />
--><modulename="logging"class="module.LoggingModule">
<InFlow>
<handlername="InFlowLogHandler"class="module.LogHandler">
<orderphase="loggingPhase"/>
</handler>
</InFlow>
<OutFlow>
<handlername="OutFlowLogHandler"class="module.LogHandler">
<orderphase="loggingPhase"/>
</handler>
</OutFlow>
<OutFaultFlow>
<handlername="FaultOutFlowLogHandler"class="module.LogHandler">
<orderphase="loggingPhase"/>
</handler>
</OutFaultFlow>
<InFaultFlow>
<handlername="FaultInFlowLogHandler"class="module.LogHandler">
<orderphase="loggingPhase"/>
</handler>
</InFaultFlow>
</module>
第4步:在axis2.xml文件中配置Axis2模块
打开axis2.xml文件,分别在如下四个<phaseOrder>元素中加入<phase name="loggingPhase"/>:
第5步:在services.xml文件中引用logging模块
services.xml文件的内容如下:
<!--<br />
<br />
Code highlighting produced by Actipro CodeHighlighter (freeware)<br />
http://www.CodeHighlighter.com/<br />
<br />
--><servicename="myService">
<description>
使用logging模块
</description>
<!--引用logging模块-->
<moduleref="logging"/>
<parametername="ServiceClass">
service.MyService
</parameter>
<messageReceivers>
<messageReceivermep="http://www.w3.org/2004/08/wsdl/in-out"
class="org.apache.axis2.rpc.receivers.RPCMessageReceiver"/>
</messageReceivers>
</service>
第6步:发布logging模块
到现在为止,我们应用可以建立两个发行包:logging.mar和service.aar。其中logging.mar文件是Axis2模块的发行包,该包的目录结构如下:
logging.mar
module/LoggingModule.class
module/LogHandler.class
META-INF/module.xml
service.aar文件是本例编写的WebService发行包,该包的目录结构如下:
service.aar
service/MyService.class
META-INF/services.xml
将logging.mar文件放在<Tomcat安装目录>/webapps/axis2/WEB-INF/modules目录中,将service.aar文件放在<Tomcat安装目录>/webapps/axis2/WEB-INF/services目录中。要注意的是,如果modules目录中包含了modules.list文件,Axis2会只装载在该文件中引用的Axis2模块,因此,必须在该文件中引用logging模块,该文件的内容如下:
addressing-1.4.1.mar
soapmonitor-1.4.1.mar
ping-1.4.1.mar
mex-1.4.1.mar
axis2-scripting-1.4.1.mar
logging.mar
如果modules目录中不包含modules.list文件,则Axis2会装载modules文件中的所有Axis2模块。
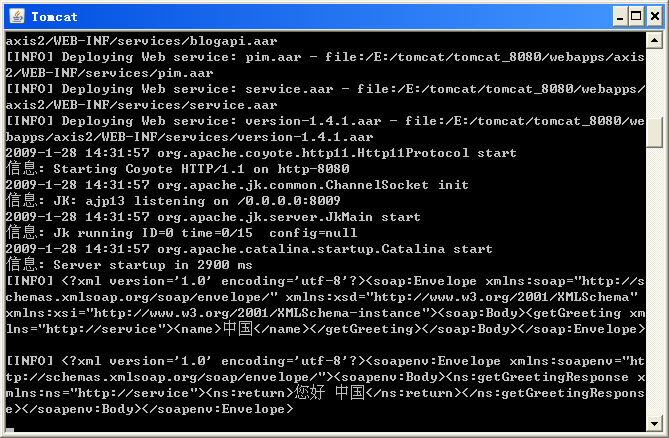
现在启动Tomcat,使用如下的C#代码调用MyService的getGreeting方法则会在Tomcat控制台中输出相应的请求和响应SOAP消息。
<!--<br />
<br />
Code highlighting produced by Actipro CodeHighlighter (freeware)<br />
http://www.CodeHighlighter.com/<br />
<br />
-->//async是引用MyService的服务名
async.myServicemy=newWSC.asyn.myService();
MessageBox.Show(my.getGreeting("中国"));
MessageBox.Show("完成调用");
在执行上面的代码后,在
Tomcat
控制台中输出的信息如下图所示。
分享到:


相关推荐
WebService大讲堂之Axis2 WebService大讲堂之Axis2 WebService大讲堂之Axis2 WebService大讲堂之Axis2 WebService大讲堂之Axis2 WebService大讲堂之Axis2
WebService大讲堂之Axis2,Axis2教程,axis2教程例子,Web_Service实例应用
Axis2是目前比较流行的WebService引擎。...本课程站在初学者角度介绍了Axis2的大多数常用的功能,例如,以多种方式编写和发布WebService、JAX-RPC、JAX-WS、复杂类型传输、WebService会话管理、Axis2模块等
webservice大讲堂之axis2.rar webservice大讲堂之axis2.rar webservice大讲堂之axis2.rar webservice大讲堂之axis2.rar webservice大讲堂之axis2.rar webservice大讲堂之axis2.rar
详细webservice大讲堂axis2
详细讲述了WebService 开发步骤
WebService大讲堂之Axis2(2):复合类型数据的传递.pdfWebService大讲堂之Axis2(2):复合类型数据的传递.pdf
在Axis2中提供了一个Axis2模块(soapmonitor),该模块实现了与《WebService大讲堂之Axis2(9):编写Axis2模块(Module)》中实现的logging模块相同的功能,所不同的是,logging模块直接将SOAP请求与响应消息输出到...
webservice大讲堂之axis2,很入门的东西
WebService大讲堂之Axis2,多个实例,非常全的文档,从新手入门开始到复杂的实例
WebService大讲堂之Axis2(4):二进制文件传输.pdf
webservice9 编写axis模块webservice9 编写axis模块
WebService_大讲堂之Axis2_系列教程.pdf