- وµڈ览: 438152 و¬،
-

و–‡ç« هˆ†ç±»
社هŒ؛版ه—
- وˆ‘çڑ„资讯 ( 0)
- وˆ‘çڑ„è®؛ه› ( 0)
- وˆ‘çڑ„é—®ç” ( 0)
هکو،£هˆ†ç±»
- 2013-09 ( 28)
- 2013-08 ( 112)
- 2013-07 ( 30)
- و›´ه¤ڑهکو،£...
وœ€و–°è¯„è®؛
-
barryzhongï¼ڑ
è؟™ç¯‡و–‡ç« وŒ؛ن¸چé”™م€‚ن»¤ن؛؛و±—颜çڑ„وک¯ï¼Œé‚£هڈ¯وک¯ه¾®è½¯06ه¹´çڑ„و–‡ç« م€‚çژ°هœ¨éƒ½ه؟« ...
وژ¨èچگن¸€ç¯‡ه…³ن؛ژه¤ڑç§ںوˆ·Multi-Tenantو•°وچ®و¶و„çڑ„و–‡ç« -
Mybeautifulï¼ڑ
设è®،و¨،ه¼ڈهڈھوک¯ن¸€ن¸ھو€è·¯وˆ–وک¯و–¹و،ˆï¼Œç¢°هˆ°وںگç§چé—®é¢کوک¯وœ‰ن»€ن¹ˆهٹو³•و¯”较ه¥½çڑ„ ...
ه†چè§پن؛†و¨،ه¼ڈ
Android程ه؛ڈو‰‹وœ؛ه¹³و؟ن¸¤ن¸چ误:Fragmentè½»و¾ه®çژ°
و¤ç¯‡و–‡ç« 系转载è‡ھï¼ڑhttp://mobile.51cto.com/aprogram-396838.htm
وک¯è§‰ه¾—è؟™ن¸ھه†™çڑ„ن¸چ错,目ه‰چو²،وœ‰و—¶é—´ï¼Œو²،è؟›è،Œه¤ھ详细çڑ„هژ»ç ”究,留ç€وœ‰و—¶é—´ه¥½ه¥½ç ”究,ن¹ںهˆ†ن؛«ç»™éœ€è¦پçڑ„وœ‹هڈ‹م€‚ه¦‚è؟‡ن½œè€…ه¯¹è½¬è½½وœ‰çœ‹و³•ï¼Œè¯·ç›´وژ¥èپ”ç³»وˆ‘م€‚psï¼ڑو–‡ç« ن¸چوک¯وˆ‘çڑ„,里é¢çڑ„é‚£ن؛›ن؛؛物ن؛‹ن»¶ï¼Œن»¥هڈٹه·¥ن½œç»ڈهژ†ç³»éƒ½وک¯هژںن½œè€…çڑ„م€‚éه¸¸و„ںè°¢ن»–çڑ„هˆ†ن؛«
è®°ه¾—وˆ‘ن¹‹ه‰چهڈ‚ن¸ژه¼€هڈ‘è؟‡ن¸€ن¸ھهچژن¸؛çڑ„é،¹ç›®ï¼Œè¦پو±‚程ه؛ڈهڈ¯ن»¥و”¯وŒپه¥½ه‡ ç§چ终端设ه¤‡ï¼Œه…¶ن¸ه°±هŒ…و‹¬ Androidو‰‹وœ؛ه’ŒAndroidPadم€‚然هگژن¸؛ن؛†èٹ‚çœپن؛؛هٹ›ï¼Œه…¬هڈ¸و— èٹ‚و“چهœ°è®©Androidو‰‹وœ؛ه’ŒAndroidPad都由وˆ‘ن»¬ه›¢éکںه¼€هڈ‘م€‚ه½“و—¶é،¹ç›® 组ه®ڑçڑ„و–¹و،ˆوک¯ï¼Œهˆ¶ن½œن¸¤ن¸ھ版وœ¬çڑ„App,ن¸€ن¸ھو‰‹وœ؛版,ن¸€ن¸ھPad版م€‚ç”±ن؛ژه½“و—¶و‰‹وœ؛版çڑ„ن¸»ن½“هٹں能ه·²ç»ڈهپڑçڑ„ه·®ن¸چه¤ڑن؛†ï¼Œو‰€ن»¥Pad版هں؛وœ¬ن¸ٹه°±وک¯وٹٹو‰‹وœ؛版çڑ„ن»£ç په®Œه…¨ و‹·è؟‡و¥ï¼Œç„¶هگژه†چو ¹وچ®ه¹³و؟çڑ„特و€§éƒ¨هˆ†ç¨چن½œن؟®و”¹ه°±ه¥½ن؛†م€‚
ن½†وک¯ï¼Œن»ژو¤ن»¥هگژوˆ‘ن»¬ه°±éه¸¸è‹¦ 逼ن؛†م€‚و¯ڈو¬،è¦پو·»هٹ ن»€ن¹ˆو–°هٹں能,هگŒو ·çڑ„ن»£ç پè¦په†™ن¸¤éپچم€‚و¯ڈو¬،è¦پن؟®ه¤چن»»ن½•bug,都è¦پهœ¨و‰‹وœ؛版ن»£ç په’ŒPad版ن»£ç پ里هگ„ن؟®و”¹ن¸€éپچم€‚è؟™è؟کن¸چç®—ن»€ن¹ˆï¼Œو¯ڈهˆ°ه‡؛版وœ¬çڑ„و—¶ه€™ ه°±و›´ç¦»è°±ن؛†م€‚هچژن¸؛è¦پو±‚و¯ڈو¬،需è¦په‡؛ن¸¤ن¸ھ版وœ¬ï¼Œن¸€ن¸ھهچژن¸؛ه†…网çژ¯ه¢ƒçڑ„版وœ¬ï¼Œن¸€ن¸ھه®¢وˆ·çژ°هœ؛çڑ„版وœ¬ï¼Œè€Œçژ°هœ¨هڈˆهˆ†ن؛†و‰‹وœ؛ه’ŒPad,ن¹ںه°±وک¯و¯ڈو¬،需è¦په‡؛ه››ن¸ھ版وœ¬م€‚ه¦‚وœهœ¨ه‡؛ ه®Œç‰ˆوœ¬هگژè‡ھوµ‹è؟که‡؛çژ°ن؛†é—®é¢ک,ه°±هڈ¯ن»¥ç›´وژ¥é€ڑه®µن؛†م€‚è؟™ه°¤ه…¶وک¯è‹¦ن؛†وˆ‘ن»¬çڑ„Xو€»(ç”±ن؛ژن»–dotaو‰“çڑ„و¯”较ه¥½ï¼Œوˆ‘都ه–œو¬¢هڈ«ن»–Xç¥)م€‚ن»–هœ¨وˆ‘ن»¬é،¹ç›®ç»„ن¸هچ•ç‹¬ç»´وٹ¤ن¸€ن¸ھو¨، ه—,ه¹¶ن¸”و¯ڈو¬،و‰“版وœ¬éƒ½وک¯ç”±ن»–è´ں责,هٹ çڈçڑ„و—¶ه€™وˆ‘ن»¬éƒ½èƒ½è·‘,ه°±وک¯ن»–è·‘ن¸چن؛†م€‚è؟™é‡Œن¹ںوک¯èµو‰¬ن¸€ن¸‹وˆ‘ن»¬Xç¥çڑ„و•¬ن¸ڑç²¾ç¥ï¼Œه¦‚وœن»–看ه¾—هˆ°çڑ„è¯م€‚
ç»ڈهژ†è؟‡é‚£ن¹ˆè‹¦é€¼و—¶وœںçڑ„وˆ‘ن¹ںه°±ه¼€ه§‹و€è€ƒï¼Œهڈ¯ن¸چهڈ¯ن»¥هˆ¶ن½œهگŒو—¶ه…¼ه®¹و‰‹وœ؛ه’Œه¹³و؟çڑ„Appه‘¢ï¼ںç”و،ˆه½“然وک¯è‚¯ه®ڑçڑ„,ن¸چè؟‡وˆ‘è؟™ن¸ھن؛؛و¯”较و‡’,ن¸€ç›´ن¹ںوڈگن¸چèµ·ç²¾ç¥هژ»é’»ç ”è؟™ن¸ھé—®é¢کم€‚ç›´هˆ°وˆ‘ن¸€ن¸ھهœ¨ç¾ژه›½ç•™ه¦çڑ„وœ‹هڈ‹Gong让وˆ‘ه¸®ه¥¹è§£ه†³ه¥¹çڑ„ç ”ç©¶ç”ںه¯¼ه¸ˆه¸ƒç½®çڑ„ن½œن¸ڑ(وˆ‘çں¥éپ“ن½ ç ”ç©¶ç”ںه¯¼ه¸ˆçœ‹ن¸چو‡‚ن¸و–‡^-^),و£ه¥½و¶‰هڈٹهˆ°ن؛†è؟™ن¸€ه—,ن¹ںه°±ه€ںو¤وœ؛ن¼ڑç ”ç©¶ن؛†ن¸€ن¸‹ï¼Œçژ°هœ¨و‹؟ه‡؛و¥è·ںه¤§ه®¶هˆ†ن؛«م€‚
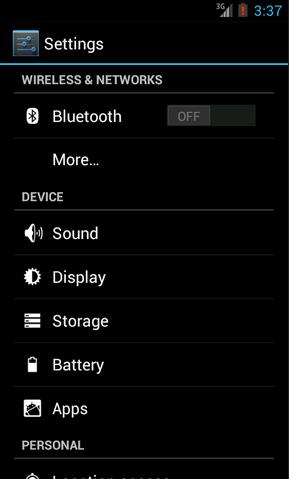
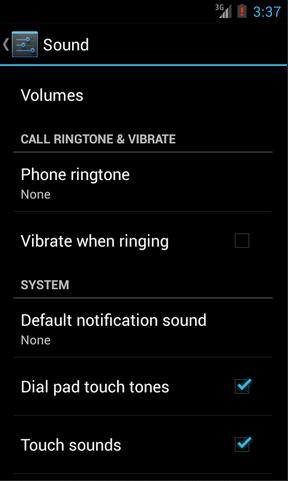
وˆ‘ن»¬ه…ˆو¥çœ‹ن¸€ن¸‹Androidو‰‹وœ؛çڑ„设置界é¢ï¼Œç‚¹ه‡»ن¸€ن¸‹Sound,هڈ¯ن»¥è·³è½¬هˆ°ه£°éں³è®¾ç½®ç•Œé¢ï¼Œه¦‚ن¸‹é¢ن¸¤ه¼ ه›¾و‰€ç¤؛ï¼ڑ
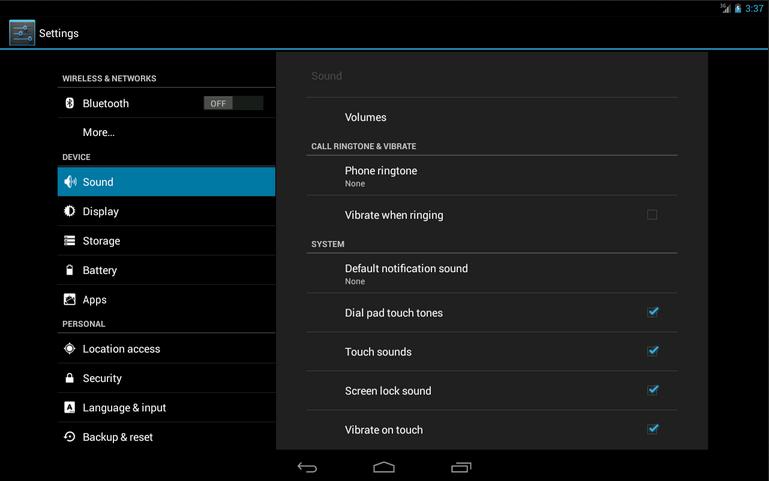
然هگژه†چو¥çœ‹ن¸€ن¸‹AndroidPadçڑ„设置界é¢ï¼Œن¸»è®¾ç½®é،µé¢ه’Œه£°éں³è®¾ç½®é،µé¢éƒ½وک¯هœ¨ن¸€ن¸ھç•Œé¢وک¾ç¤؛çڑ„,ه¦‚ن¸‹ه›¾و‰€ç¤؛ï¼ڑ
ه¦‚وœè؟™هˆ†هˆ«وک¯ن¸¤ن¸ھن¸چهگŒçڑ„Appهپڑه‡؛çڑ„و•ˆوœï¼Œé‚£و²،وœ‰ن¸و¯«وƒٹه¥‡ن¹‹ه¤„م€‚ن½†ه¦‚وœوک¯هگŒن¸€ن¸ھApp,هœ¨و‰‹وœ؛ن¸ٹه’Œه¹³و؟ن¸ٹè؟گè،Œهˆ†هˆ«وœ‰ن»¥ن¸ٹن¸¤ç§چو•ˆوœçڑ„è¯ï¼Œن½ وک¯ن¸چوک¯ه°±ه·²ç»ڈه؟ƒهٹ¨ن؛†ï¼ںوˆ‘ن»¬çژ°هœ¨ه°±و¥و¨،و‹ںه®çژ°ن¸€ن¸‹م€‚
首ه…ˆن½ 需è¦په¯¹Fragmentوœ‰ن¸€ه®ڑçڑ„ن؛†è§£ï¼Œه¦‚وœن½ è؟کو²،وژ¥è§¦è؟‡Fragment,ه»؛è®®هڈ¯ن»¥ه…ˆéک…读AndroidFragmentه®Œه…¨è§£وگ,ه…³ن؛ژç¢ژ片ن½ و‰€éœ€çں¥éپ“çڑ„ن¸€هˆ‡è؟™ç¯‡و–‡ç« م€‚ه¹¶ن¸”وœ¬و¬،çڑ„ن»£ç پوک¯è؟گè،Œهœ¨Android4.0版وœ¬ن¸ٹçڑ„,ه¦‚وœن½ çڑ„SDK版وœ¬è؟کو¯”较ن½ژçڑ„è¯ï¼Œه»؛è®®هڈ¯ن»¥ه…ˆهچ‡هچ‡ç؛§ن؛†م€‚
و–°ه»؛ن¸€ن¸ھAndroidé،¹ç›®ï¼Œهڈ–هگچهڈ«FragmentDemoم€‚و‰“ه¼€وˆ–و–°ه»؛MainActivityن½œن¸؛程ه؛ڈçڑ„ن¸»Activity,里é¢وœ‰ه¦‚ن¸‹è‡ھهٹ¨ç”ںوˆگçڑ„ه†…ه®¹ï¼ڑ
- publicclassMainActivityextendsActivity{
- @Override
- publicvoidonCreate(BundlesavedInstanceState){
- super.onCreate(savedInstanceState);
- setContentView(R.layout.activity_main);
- }
- }
- publicclassMainActivityextendsActivity{
- @Override
- publicvoidonCreate(BundlesavedInstanceState){
- super.onCreate(savedInstanceState);
- setContentView(R.layout.activity_main);
- }
- }
ن½œن¸؛ن¸€ن¸ھAndroidè€پو‰‹ï¼Œن¸ٹé¢çڑ„ن»£ç په®هœ¨ه¤ھه°ڈه„؟科ن؛†ï¼Œو¯ڈن¸ھActivityن¸éƒ½ن¼ڑوœ‰è؟™و ·çڑ„ن»£ç پم€‚ن¸چè؟‡ن»ٹه¤©وˆ‘ن»¬çڑ„程ه؛ڈهڈ¯ن¸چن¼ڑè؟™ن¹ˆç®€هچ•ï¼Œهٹ è½½ه¸ƒه±€è؟™ن¸€ه—è؟کوک¯ه¤§وœ‰و–‡ç« çڑ„م€‚
و‰“ه¼€وˆ–و–°ه»؛res/layout/activity_main.xmlن½œن¸؛程ه؛ڈçڑ„ن¸»ه¸ƒه±€و–‡ن»¶ï¼Œé‡Œé¢ن»£ç په¦‚ن¸‹ï¼ڑ
- <LinearLayoutxmlns:android="http://schemas.android.com/apk/res/android"
- xmlns:tools="http://schemas.android.com/tools"
- android:layout_width="fill_parent"
- android:layout_height="fill_parent"
- android:orientation="horizontal"
- tools:context=".MainActivity">
- <fragment
- android:id="@+id/menu_fragment"
- android:name="com.example.fragmentdemo.MenuFragment"
- android:layout_width="fill_parent"
- android:layout_height="fill_parent"
- />
- </LinearLayout>
è؟™ن¸ھه¸ƒه±€ه¼•ç”¨ن؛†ن¸€ن¸ھMenuFragment,وˆ‘ن»¬ç¨چهگژو¥è؟›è،Œه®çژ°ï¼Œه…ˆو¥çœ‹ن¸€ن¸‹ن»ٹه¤©çڑ„ن¸€ن¸ھé‡چ点,وˆ‘ن»¬éœ€è¦په†چو–°ه»؛ن¸€ن¸ھactivity_main.xml,è؟™ن¸ھه¸ƒه±€و–‡ن»¶هگچه’Œه‰چé¢çڑ„ن¸»ه¸ƒه±€و–‡ن»¶هگچوک¯ن¸€و ·çڑ„,ن½†وک¯è¦پو”¾هœ¨ن¸چهگŒçڑ„ç›®ه½•ن¸‹é¢م€‚
هœ¨resç›®ه½•ن¸‹و–°ه»؛layout-largeç›®ه½•ï¼Œç„¶هگژè؟™ن¸ھç›®ه½•ن¸‹هˆ›ه»؛و–°çڑ„activity_main.xml,هٹ ه…¥ه¦‚ن¸‹ن»£ç پï¼ڑ
- <LinearLayoutxmlns:android="http://schemas.android.com/apk/res/android"
- xmlns:tools="http://schemas.android.com/tools"
- android:layout_width="fill_parent"
- android:layout_height="fill_parent"
- android:orientation="horizontal"
- android:baselineAligned="false"
- tools:context=".MainActivity"
- >
- <fragment
- android:id="@+id/left_fragment"
- android:name="com.example.fragmentdemo.MenuFragment"
- android:layout_width="0dip"
- android:layout_height="fill_parent"
- android:layout_weight="1"
- />
- <FrameLayout
- android:id="@+id/details_layout"
- android:layout_width="0dip"
- android:layout_height="fill_parent"
- android:layout_weight="3"
- ></FrameLayout>
- </LinearLayout>
è؟™ن¸ھه¸ƒه±€هگŒو ·ن¹ںه¼•ç”¨ن؛†MenuFragment,هڈ¦ه¤–è؟کهٹ ه…¥ن؛†ن¸€ن¸ھFrameLayout用ن؛ژوک¾ç¤؛详细ه†…ه®¹م€‚ه…¶ه®ن¹ںه°±وک¯هˆ†هˆ«ه¯¹ه؛”ن؛†ه¹³و؟ç•Œé¢ن¸ٹçڑ„ه·¦ن¾§ه¸ƒه±€ه’Œهڈ³ن¾§ه¸ƒه±€م€‚
è؟™é‡Œç”¨هˆ°ن؛†هٹ¨و€پهٹ è½½ه¸ƒه±€çڑ„وٹ€ه·§ï¼Œé¦–ه…ˆActivityن¸è°ƒç”¨setContentView(R.layout.activity_main),è،¨وکژه½“ه‰چ çڑ„Activityوƒ³هٹ è½½activity_mainè؟™ن¸ھه¸ƒه±€و–‡ن»¶م€‚而Androidç³»ç»ںهڈˆن¼ڑو ¹وچ®ه½“ه‰چçڑ„è؟گè،Œçژ¯ه¢ƒهˆ¤و–程ه؛ڈوک¯هگ¦è؟گè،Œهœ¨ه¤§ه±ڈه¹•è®¾ه¤‡ن¸ٹ,ه¦‚وœè؟گ è،Œهœ¨ه¤§ه±ڈه¹•è®¾ه¤‡ن¸ٹ,ه°±هٹ è½½layout-largeç›®ه½•ن¸‹çڑ„activity_main.xml,هگ¦هˆ™ه°±é»ک认هٹ è½½layoutç›®ه½•ن¸‹çڑ„ activity_main.xmlم€‚
ه…³ن؛ژهٹ¨و€پهٹ è½½ه¸ƒه±€çڑ„و›´ه¤ڑه†…ه®¹ï¼Œهڈ¯ن»¥éک…读Androidه®کو–¹وڈگن¾›çڑ„و”¯وŒپن¸چهگŒه±ڈه¹•ه¤§ه°ڈçڑ„ه…¨éƒ¨و–¹و³•è؟™ç¯‡و–‡ç« م€‚
ن¸‹é¢وˆ‘ن»¬و¥ه®çژ°ن¹…è؟çڑ„MenuFragment,و–°ه»؛ن¸€ن¸ھMenuFragment类继و‰؟è‡ھFragment,ه…·ن½“ن»£ç په¦‚ن¸‹ï¼ڑ
- publicclassMenuFragmentextendsFragmentimplementsOnItemClickListener{
- /**
- *èڈœهچ•ç•Œé¢ن¸هڈھهŒ…هگ«ن؛†ن¸€ن¸ھListViewم€‚
- */
- privateListViewmenuList;
- /**
- *ListViewçڑ„适é…چه™¨م€‚
- */
- privateArrayAdapter<String>adapter;
- /**
- *用ن؛ژه،«ه……ListViewçڑ„و•°وچ®ï¼Œè؟™é‡Œه°±ç®€هچ•هڈھ用ن؛†ن¸¤و،و•°وچ®م€‚
- */
- privateString[]menuItems={"Sound","Display"};
- /**
- *وک¯هگ¦وک¯هڈŒé،µو¨،ه¼ڈم€‚ه¦‚وœن¸€ن¸ھActivityن¸هŒ…هگ«ن؛†ن¸¤ن¸ھFragment,ه°±وک¯هڈŒé،µو¨،ه¼ڈم€‚
- */
- privatebooleanisTwoPane;
- /**
- *ه½“Activityه’ŒFragmentه»؛ç«‹ه…³èپ”و—¶ï¼Œهˆه§‹هŒ–适é…چه™¨ن¸çڑ„و•°وچ®م€‚
- */
- @Override
- publicvoidonAttach(Activityactivity){
- super.onAttach(activity);
- adapter=newArrayAdapter<String>(activity,android.R.layout.simple_list_item_1,menuItems);
- }
- /**
- *هٹ è½½menu_fragmentه¸ƒه±€و–‡ن»¶ï¼Œن¸؛ListView绑ه®ڑن؛†é€‚é…چه™¨ï¼Œه¹¶è®¾ç½®ن؛†ç›‘هگ¬ن؛‹ن»¶م€‚
- */
- @Override
- publicViewonCreateView(LayoutInflaterinflater,ViewGroupcontainer,BundlesavedInstanceState){
- Viewview=inflater.inflate(R.layout.menu_fragment,container,false);
- menuList=(ListView)view.findViewById(R.id.menu_list);
- menuList.setAdapter(adapter);
- menuList.setOnItemClickListener(this);
- returnview;
- }
- /**
- *ه½“Activityهˆ›ه»؛ه®Œو¯•هگژ,ه°è¯•èژ·هڈ–ن¸€ن¸‹ه¸ƒه±€و–‡ن»¶ن¸وک¯هگ¦وœ‰details_layoutè؟™ن¸ھه…ƒç´ ,ه¦‚وœوœ‰è¯´وکژه½“ه‰چ
- *وک¯هڈŒé،µو¨،ه¼ڈ,ه¦‚وœو²،وœ‰è¯´وکژه½“ه‰چوک¯هچ•é،µو¨،ه¼ڈم€‚
- */
- @Override
- publicvoidonActivityCreated(BundlesavedInstanceState){
- super.onActivityCreated(savedInstanceState);
- if(getActivity().findViewById(R.id.details_layout)!=null){
- isTwoPane=true;
- }else{
- isTwoPane=false;
- }
- }
- /**
- *ه¤„çگ†ListViewçڑ„点ه‡»ن؛‹ن»¶ï¼Œن¼ڑو ¹وچ®ه½“ه‰چوک¯هگ¦وک¯هڈŒé،µو¨،ه¼ڈè؟›è،Œهˆ¤و–م€‚ه¦‚وœوک¯هڈŒé،µو¨،ه¼ڈ,هˆ™ن¼ڑهٹ¨و€پو·»هٹ Fragmentم€‚
- *ه¦‚وœن¸چوک¯هڈŒé،µو¨،ه¼ڈ,هˆ™ن¼ڑو‰“ه¼€و–°çڑ„Activityم€‚
- */
- @Override
- publicvoidonItemClick(AdapterView<?>arg0,Viewview,intindex,longarg3){
- if(isTwoPane){
- Fragmentfragment=null;
- if(index==0){
- fragment=newSoundFragment();
- }elseif(index==1){
- fragment=newDisplayFragment();
- }
- getFragmentManager().beginTransaction().replace(R.id.details_layout,fragment).commit();
- }else{
- Intentintent=null;
- if(index==0){
- intent=newIntent(getActivity(),SoundActivity.class);
- }elseif(index==1){
- intent=newIntent(getActivity(),DisplayActivity.class);
- }
- startActivity(intent);
- }
- }
- }
è؟™ن¸ھç±»çڑ„ن»£ç په¹¶ن¸چé•؟,وˆ‘简هچ•çڑ„说وکژن¸€ن¸‹م€‚هœ¨onCreateViewو–¹و³•ن¸هٹ è½½ن؛†menu_fragmentè؟™ن¸ھه¸ƒه±€ï¼Œè؟™ن¸ھه¸ƒه±€é‡Œé¢هŒ…هگ« ن؛†ن¸€ن¸ھListView,然هگژوˆ‘ن»¬ه¯¹è؟™ن¸ھListViewه،«ه……ن؛†ن¸¤ن¸ھ简هچ•çڑ„و•°وچ®"Sound"ه’Œ"Display"م€‚هڈˆهœ¨ onActivityCreatedو–¹و³•ن¸هپڑن؛†ن¸€ن¸ھهˆ¤و–,ه¦‚وœActivityçڑ„ه¸ƒه±€ن¸هŒ…هگ«ن؛†details_layoutè؟™ن¸ھه…ƒç´ ,那ن¹ˆه½“ه‰چه°±وک¯هڈŒé،µو¨، ه¼ڈ,هگ¦هˆ™ه°±وک¯هچ•é،µو¨،ه¼ڈم€‚onItemClickو–¹و³•هˆ™ه¤„çگ†ن؛†ListViewçڑ„点ه‡»ن؛‹ن»¶ï¼Œهڈ‘çژ°ه¦‚وœه½“ه‰چوک¯هڈŒé،µو¨،ه¼ڈ,ه°±هٹ¨و€په¾€details_layout ن¸و·»هٹ Fragment,ه¦‚وœه½“ه‰چوک¯هچ•é،µو¨،ه¼ڈ,ه°±ç›´وژ¥و‰“ه¼€و–°çڑ„Activityم€‚
وˆ‘ن»¬وٹٹMenuFragmentن¸ه¼•ç”¨هˆ°çڑ„ه…¶ه®ƒه†…ه®¹ن¸€ن¸ھن¸ھو·»هٹ è؟›و¥م€‚و–°ه»؛menu_fragment.xmlو–‡ن»¶ï¼Œهٹ ه…¥ه¦‚ن¸‹ن»£ç پï¼ڑ
- <?xmlversion="1.0"encoding="UTF-8"?>
- <LinearLayoutxmlns:android="http://schemas.android.com/apk/res/android"
- android:layout_width="fill_parent"
- android:layout_height="fill_parent">
- <ListView
- android:id="@+id/menu_list"
- android:layout_width="fill_parent"
- android:layout_height="fill_parent"
- ></ListView>
- </LinearLayout>
然هگژو–°ه»؛SoundFragment,里é¢ه†…ه®¹éه¸¸ç®€هچ•ï¼ڑ
- publicclassSoundFragmentextendsFragment{
- @Override
- publicViewonCreateView(LayoutInflaterinflater,ViewGroupcontainer,BundlesavedInstanceState){
- Viewview=inflater.inflate(R.layout.sound_fragment,container,false);
- returnview;
- }
- }
- publicclassSoundFragmentextendsFragment{
- @Override
- publicViewonCreateView(LayoutInflaterinflater,ViewGroupcontainer,BundlesavedInstanceState){
- Viewview=inflater.inflate(R.layout.sound_fragment,container,false);
- returnview;
- }
- }
è؟™é‡ŒSoundFragment需è¦پ用هˆ°sound_fragment.xmlه¸ƒه±€و–‡ن»¶ï¼Œه› و¤è؟™é‡Œوˆ‘ن»¬و–°ه»؛è؟™ن¸ھه¸ƒه±€و–‡ن»¶ï¼Œه¹¶هٹ ه…¥ه¦‚ن¸‹ن»£ç پï¼ڑ
- <?xmlversionxmlversion="1.0"encoding="utf-8"?>
- ativeLayoutxmlns:androidRelativeLayoutxmlns:android="http://schemas.android.com/apk/res/android"
- android:layout_width="match_parent"
- android:layout_height="match_parent"
- android:background="#00ff00"
- android:orientation="vertical">
- <TextView
- android:layout_width="wrap_content"
- android:layout_height="wrap_content"
- android:layout_centerInParent="true"
- android:textSize="28sp"
- android:textColor="#000000"
- android:text="Thisissoundview"
- />
- </RelativeLayout>
- <?xmlversion="1.0"encoding="utf-8"?>
- <RelativeLayoutxmlns:android="http://schemas.android.com/apk/res/android"
- android:layout_width="match_parent"
- android:layout_height="match_parent"
- android:background="#00ff00"
- android:orientation="vertical">
- <TextView
- android:layout_width="wrap_content"
- android:layout_height="wrap_content"
- android:layout_centerInParent="true"
- android:textSize="28sp"
- android:textColor="#000000"
- android:text="Thisissoundview"
- />
- </RelativeLayout>
هگŒو ·çڑ„éپ“çگ†ï¼Œوˆ‘ن»¬ه†چو–°ه»؛DisplayFragmentه’Œdisplay_fragment.xmlه¸ƒه±€و–‡ن»¶ï¼ڑ
- publicclassDisplayFragmentextendsFragment{
- publicViewonCreateView(LayoutInflaterinflater,ViewGroupcontainer,BundlesavedInstanceState){
- Viewview=inflater.inflate(R.layout.display_fragment,container,false);
- returnview;
- }
- }
- <?xmlversion="1.0"encoding="utf-8"?>
- <RelativeLayoutxmlns:android="http://schemas.android.com/apk/res/android"
- android:layout_width="match_parent"
- android:layout_height="match_parent"
- android:background="#0000ff"
- android:orientation="vertical">
- <TextView
- android:layout_width="wrap_content"
- android:layout_height="wrap_content"
- android:layout_centerInParent="true"
- android:textSize="28sp"
- android:textColor="#000000"
- android:text="Thisisdisplayview"
- />
- </RelativeLayout>
然هگژو–°ه»؛SoundActivity,ن»£ç په¦‚ن¸‹ï¼ڑ
- publicclassSoundActivityextendsActivity{
- @Override
- protectedvoidonCreate(BundlesavedInstanceState){
- super.onCreate(savedInstanceState);
- setContentView(R.layout.sound_activity);
- }
- }
- publicclassSoundActivityextendsActivity{
- @Override
- protectedvoidonCreate(BundlesavedInstanceState){
- super.onCreate(savedInstanceState);
- setContentView(R.layout.sound_activity);
- }
- }
è؟™ن¸ھActivityهڈھوک¯هٹ è½½ن؛†ن¸€ن¸ھه¸ƒه±€و–‡ن»¶ï¼Œçژ°هœ¨وˆ‘ن»¬و¥ه®çژ°sound_activity.xmlè؟™ن¸ھه¸ƒه±€و–‡ن»¶ï¼ڑ
- <?xmlversion="1.0"encoding="utf-8"?>
- <fragmentxmlns:android="http://schemas.android.com/apk/res/android"
- android:id="@+id/sound_fragment"
- android:name="com.example.fragmentdemo.SoundFragment"
- android:layout_width="match_parent"
- android:layout_height="match_parent">
- </fragment>
- <?xmlversion="1.0"encoding="utf-8"?>
- <fragmentxmlns:android="http://schemas.android.com/apk/res/android"
- android:id="@+id/sound_fragment"
- android:name="com.example.fragmentdemo.SoundFragment"
- android:layout_width="match_parent"
- android:layout_height="match_parent">
- </fragment>
è؟™ن¸ھه¸ƒه±€و–‡ن»¶ه¼•ç”¨ن؛†SoundFragment,è؟™و ·ه†™çڑ„ه¥½ه¤„ه°±وک¯ï¼Œن»¥هگژوˆ‘ن»¬هڈھ需è¦پهœ¨SoundFragmentن¸ن؟®و”¹ن»£ç پ,SoundActivityه°±ن¼ڑè·ںç€è‡ھهٹ¨و”¹هڈکن؛†ï¼Œه› ن¸؛ه®ƒو‰€وœ‰çڑ„ن»£ç پ都وک¯ن»ژSoundFragmentن¸ه¼•ç”¨è؟‡و¥çڑ„م€‚
ه¥½ï¼ŒهگŒو ·çڑ„و–¹و³•ï¼Œوˆ‘ن»¬ه†چه®ŒوˆگDisplayActivityï¼ڑ
- publicclassDisplayActivityextendsActivity{
- @Override
- protectedvoidonCreate(BundlesavedInstanceState){
- super.onCreate(savedInstanceState);
- setContentView(R.layout.display_activity);
- }
- }
- publicclassDisplayActivityextendsActivity{
- @Override
- protectedvoidonCreate(BundlesavedInstanceState){
- super.onCreate(savedInstanceState);
- setContentView(R.layout.display_activity);
- }
- }
然هگژهٹ ه…¥display_activity.xml:
- <?xmlversion="1.0"encoding="utf-8"?>
- <fragmentxmlns:android="http://schemas.android.com/apk/res/android"
- android:id="@+id/display_fragment"
- android:name="com.example.fragmentdemo.DisplayFragment"
- android:layout_width="match_parent"
- android:layout_height="match_parent">
- </fragment>
- <?xmlversion="1.0"encoding="utf-8"?>
- <fragmentxmlns:android="http://schemas.android.com/apk/res/android"
- android:id="@+id/display_fragment"
- android:name="com.example.fragmentdemo.DisplayFragment"
- android:layout_width="match_parent"
- android:layout_height="match_parent">
- </fragment>
çژ°هœ¨و‰€وœ‰çڑ„ن»£ç په°±éƒ½ه·²ç»ڈه®Œوˆگن؛†ï¼Œوˆ‘ن»¬و¥çœ‹ن¸€ن¸‹و•ˆوœهگ§م€‚
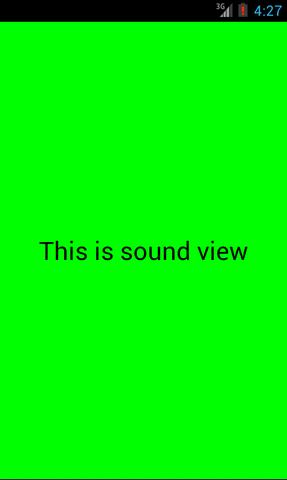
首ه…ˆه°†ç¨‹ه؛ڈè؟گè،Œهœ¨و‰‹وœ؛ن¸ٹ,و•ˆوœه›¾ه¦‚ن¸‹ï¼ڑ
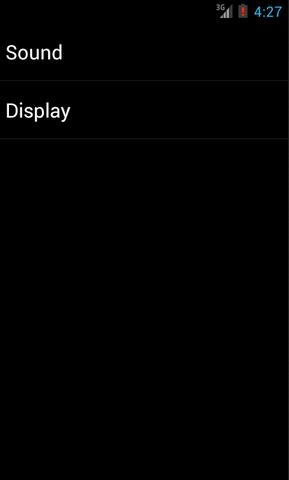
هˆ†هˆ«ç‚¹ه‡»Soundه’ŒDisplay,界é¢ن¼ڑ跳转هˆ°ه£°éں³ه’Œوک¾ç¤؛ç•Œé¢ï¼ڑ

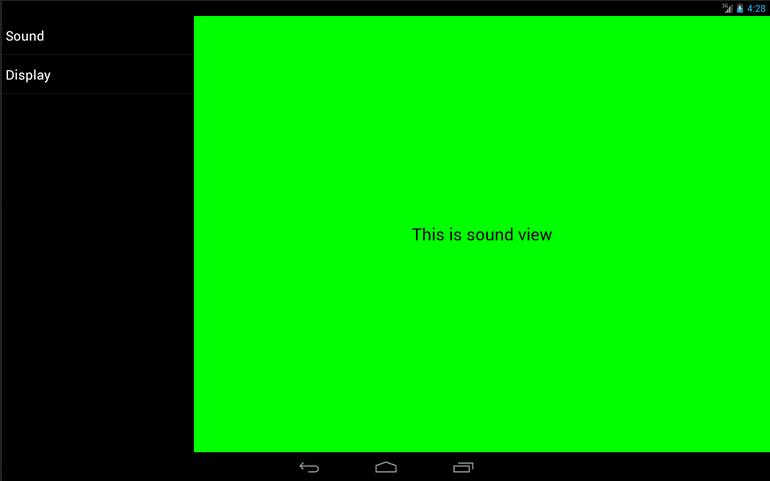
然هگژه°†ç¨‹ه؛ڈهœ¨ه¹³و؟ن¸ٹè؟گè،Œï¼Œç‚¹ه‡»Sound,و•ˆوœه›¾ه¦‚ن¸‹ï¼ڑ
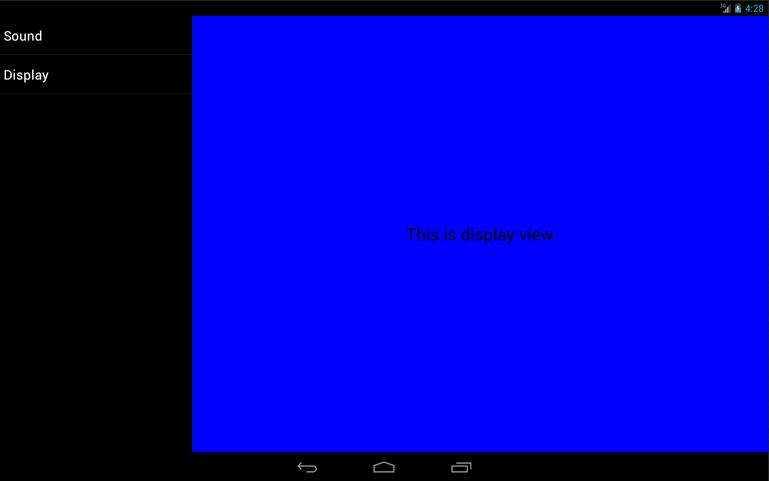
然هگژ点ه‡»Displayهˆ‡وچ¢هˆ°وک¾ç¤؛ç•Œé¢ï¼Œو•ˆوœه›¾ه¦‚ن¸‹ï¼ڑ
è؟™و ·وˆ‘ن»¬ه°±وˆگهٹںهœ°è®©ç¨‹ه؛ڈهگŒو—¶ه…¼ه®¹و‰‹وœ؛ه’Œه¹³و؟ن؛†م€‚ه½“然,è؟™هڈھوک¯ن¸€ن¸ھ简هچ•çڑ„demo,و›´ه¤ڑه¤چو‚çڑ„ه†…ه®¹éœ€è¦په¤§ه®¶è‡ھه·±هژ»ه®çژ°ن؛†م€‚
ه¥½ن؛†ï¼Œن»ٹه¤©çڑ„讲解هˆ°و¤ç»“وںم€‚


- 2013-07-17 16:10
- وµڈ览 717
- 评è®؛(0)
- وں¥çœ‹و›´ه¤ڑ
هڈ‘è،¨è¯„è®؛

相ه…³وژ¨èچگ
Androidن½؟用Fragmentه®çژ°ه…¼ه®¹و‰‹وœ؛ه’Œه¹³و؟çڑ„程ه؛ڈ
Android 程ه؛ڈوٹ€وœ¯ وœ¬èٹ‚课程ه†…ه®¹ï¼ڑFragmentçڑ„ن»‹ç»چ Fragment Fragment(ç¢ژ片)وک¯ن¸€ç§چهڈ¯ن»¥هµŒه…¥هœ¨Activityن¸çڑ„UI片و®µï¼Œن¸ژActivityéه¸¸ç›¸ن¼¼ï¼Œن¸چن»…هŒ…هگ«ه¸ƒه±€ï¼ŒهگŒو—¶ن¹ںه…·وœ‰è‡ھه·±çڑ„ç”ںه‘½ه‘¨وœں Fragmentن¸چ能独立هکهœ¨ه؟…é،»هµŒه…¥هˆ°...
androidx-fragment-1.1.0.aar
و¤ن¸؛ç¤؛ن¾‹ن»£ç پ,详细讲解请هڈ‚考 http://blog.csdn.net/sinyu890807/article/details/8744943
ç–¯ه…„认ن¸؛,ن¸€ن¸ھ设è®،ن¼ک良çڑ„androidه؛”用程ه؛ڈ,ه؟…ه®ڑه¾—ç›ٹن؛ژFragmentçڑ„ه®Œç¾ژن½؟用م€‚وœ¬é›†ن¸»è¦په†…ه®¹ه¦‚ن¸‹ï¼ڑ1. Fragment简ن»‹ 2. Fragmentçڑ„هˆ›ه»؛ه’Œه®çژ° 3. Fragmentه’ŒActivityçڑ„و•°وچ®ن¼ 递 4. Fragmentç®،çگ†ه™¨ه’Œن؛‹هٹ،
- Fragmentوک¯ن¸€ç§چهڈ¯ن»¥هµŒه…¥هœ¨Activityه½“ن¸çڑ„UI片و®µï¼Œه®ƒèƒ½è®©ç¨‹ه؛ڈو›´هٹ هگˆçگ†ه’Œه……هˆ†هœ°هˆ©ç”¨ه¤§ه±ڈه¹•çڑ„ç©؛间,ه› 而هœ¨ه¹³و؟ن¸ٹه؛”用ه¾—éه¸¸ه¹؟و³›م€‚ - ه’ŒActivityه¾ˆهƒڈ,هگŒو ·éƒ½èƒ½هŒ…هگ«ه¸ƒه±€ï¼ŒهگŒو ·éƒ½وœ‰è‡ھه·±çڑ„ç”ںه‘½ه‘¨وœںم€‚ - و‰‹وœ؛ه¹³و؟è¦په…¼é،¾ï¼Œ...
androidه…¼ه®¹و‰‹وœ؛ه’Œه¹³و؟çڑ„Fragment
è؟™وک¯Pro Androidه¦ن¹ Fragment部هˆ†çڑ„ن¾‹هگو؛گن»£ç پم€‚
Fragmentçڑ„و¦‚ه؟µوک¯ن»ژAndroid3.0ه¼€ه§‹ه¼•ه…¥çڑ„,直译ن¸؛ç¢ژ片م€پ片و®µï¼Œç›®çڑ„وک¯ن¸؛ن¸چهگŒه±ڈه¹•ه¤§ه°ڈçڑ„设ه¤‡(و‰‹وœ؛م€په¹³و؟ç‰)هˆ›ه»؛çپµو´»هٹ¨و€پçڑ„UIم€‚è¯ڑه¦‚ه…¶هگچ,ن½ هڈ¯ن»¥وٹٹFragmentه½“ن½œوک¯Activityçڑ„و¨،ه—هŒ–组ن»¶ï¼Œه®ƒو‹¥وœ‰è‡ھه·±çڑ„ç”ںه‘½ه‘¨وœںه’ŒUI,وژ¥هڈ—...
ن»¥ه‰چهپڑè؟™ç§چو–°é—»و ‡ç¾é،µéƒ½وک¯ç”¨...ه½“وٹٹapiهچ‡ç؛§هˆ°وœ€و–°هگژهڈ‘çژ°è؟™ن¸ھLocalActivityManagerه·²ç»ڈ被ه؛ںه¼ƒن؛†ï¼Œهڈ–而ن»£ن¹‹çڑ„وک¯FragmentManager,ç»ڈè؟‡ن¸€ن¸‹هچˆçڑ„ç ”ç©¶ç»ˆن؛ژ用FragmentManagerه®çژ°ن؛†و–°é—»و»‘هٹ¨و ‡ç¾é،µçڑ„و•ˆوœم€‚
androidï¼ڑFragmentه’ŒActivityن¹‹é—´çڑ„é€ڑ讯هˆ†ن؛«.pdf
é—®é¢ک解ه†³ï¼ڑFragment not attached to Activityçڑ„相ه…³ن»£ç پ,و›´ه¤ڑ详细ه†…ه®¹è¯·هڈ‚考ï¼ڑhttp://blog.csdn.net/u012939909/article/details/53355836
é€ڑè؟‡ن¸€ن¸ھه°ڈ程ه؛ڈه®çژ°ن؛†Androidçڑ„Fragment,وœ‰ه…´è¶£çڑ„هڈ¯ن»¥ن¸‹è½½çœ‹çœ‹
android ن؛Œç»´ç پو‰«وڈڈé،µé¢Fragment çڑ„ه®çژ°ï¼Œن½؟用éه¸¸ç®€هچ•ï¼Œوٹٹé،¹ç›®ه¯¼ه…¥è‡ھه·±çڑ„studioن¸ï¼Œ MipcaFragmentCapture mipcaFragmentCapture = new MipcaFragmentCapture();mipcaFragmentCapture.setIndicator(indicator); ...
ن¸»è¦پç»™ه¤§ه®¶ن»‹ç»چن؛†Androidهœ¨Fragmentن¸ه®çژ°ç›‘هگ¬è§¦و‘¸ن؛‹ن»¶çڑ„相ه…³èµ„و–™ï¼Œو–‡ن¸ن»‹ç»چçڑ„éه¸¸è¯¦ç»†ï¼Œه¯¹ه¤§ه®¶ه…·وœ‰ن¸€ه®ڑçڑ„هڈ‚考ه¦ن¹ ن»·ه€¼ï¼Œéœ€è¦پçڑ„وœ‹هڈ‹ن»¬ن¸‹é¢و¥ن¸€èµ·çœ‹çœ‹هگ§م€‚
androidه¹³و؟电脑ه¼€هڈ‘,ن½؟用Fragmentه®çژ°é،µé¢çڑ„ه±€éƒ¨è·³è½¬ï¼Œهƒڈç®،çگ†ç³»ç»ںن¸€و ·ï¼Œç‚¹ه‡»ه·¦è¾¹çڑ„è؟وژ¥ه®çژ°هڈ³è¾¹é،µé¢çڑ„跳转
Android程ه؛ڈç ”هڈ‘و؛گç پAndroid ViewPager+Fragmentه®çژ°QQç•Œé¢
هœ¨android 2.xو—¶ن»£ï¼Œوˆ‘ن»¬هڈ¯èƒ½ن¼ڑهœ°ن½؟用ActivityGroupو¥ه®çژ°è؟™ç§چ,ن½†وک¯éڑڈç€jelly beançڑ„ه¸‚هœ؛ن»½é¢è¶…è؟‡50%,وˆ‘ن»¬ن¼ڑهڈ‘çژ°وœ‰ن¸€ç§چو–°çڑ„组ه»؛ه‡؛çژ°ن؛†ï¼Œه®ƒهڈ«Fragment...而è؟™ç§چه؛•éƒ¨é€‰é،¹هچ،çڑ„é£ژو ¼ç•Œé¢çڑ„ه®çژ°ن¹ںç”±ActivityGroup转هگ‘ن؛†...
é€ڑè؟‡ن¸چهگŒه°؛ه¯¸çڑ„ه±ڈه¹•و¥è¯†هˆ«و‰‹وœ؛ن¸ژه¹³و؟,و ¹وچ®ه½“ه‰چه¸ƒه±€ن¸وک¯هگ¦وœ‰ن¸“é—¨ن¸؛ه¹³و؟ه¸ƒه±€çڑ„وژ§ن»¶IDو¥هŒ؛هˆ†و‰‹وœ؛ن¸ژه¹³و؟,ن»ژ而ه®çژ°و‰‹وœ؛ن¸ژه¹³و؟ن¸چن¸چهگŒçڑ„و ·ه¼ڈه’Œهٹں能
وˆ‘çڑ„ه¾®هچڑم€ٹé،µé¢و¶و„ن؛Œï¼ڑFragment+LinearLayoutم€‹ه¯¹ه؛”çڑ„ه®Œو•´و؛گن»£ç پçڑ„module